Cinema 4D

Call for price
3D FOR THE WHOLE WORLD
When it comes to high-end 3D content creation, Cinema 4D has always been Easy to Learn and Easy to Use – a real-world solution for design professionals. Now we’re making Cinema 4D the Easiest to Acquire.
3D FOR THE WHOLE WORLD
When it comes to high-end 3D content creation, Cinema 4D has always been Easy to Learn and Easy to Use – a real-world solution for design professionals. Now we’re making Cinema 4D the Easiest to Acquire.
Polygons are the building blocks of 3D, stitched together to create the objects of your imagination. With Cinema 4D’s complete polygonal modeling toolset, it’s easy to craft everything from cars to creatures.
Knife Tool
Slice models with quick precision using a trio of tools that offer outstanding interactivity. Make more polygons and add more detail – edit cuts before committing, cut evenly-spaced slices, and add symmetrical loops with ease.
Polygon Pen
Paint polygons with Cinema 4D’s modeling “Swiss army knife”, a single super-tool for creating or retopologizing 3D models.
- Create Polygon – Click to add points and quickly create polygons, whether modeling from scratch or snapping to existing geometry for retopology.
- Rotate Edge – Refine the polygon flow by spinning an edge around its center.
- Snap To Edge – Extend the surface easily with edges that snap to each other.
- Draw Row – Paint strips of polygons interactively.
- Modeling Arc – Convert simple edges into complex arcs in a single action.
- Extrude – Create solid shapes by extruding, without changing tools.
Extrude
Extrude selected points, edges or polygons.
Stitch & Sew
Join object edges that have the same number of points.
Bevel
Soften hard edges without Subdivison Surface Objects.
Mesh Check
Show faulty elements on selected polygon objects.
Parametric Modeling
The first step in most 3D projects is creating the objects.
Keep 3D visualizations flexible to the end with parametric modeling. Changes can be made at any time to scenes or objects, and Cinema 4D offers a wide range of parametric modeling options that make it possible for artists to make just about any last-minute change a customer may need!
Modeling with MoGraph
Motion Design Tool Gone Wild!
Cinema 4D’s MoGraph toolset is unmatched in the 3D industry. Originally created for motion design and broadcast graphics, it quickly established itself in many other areas of 3D visualization. MoGraph can be used to quickly and easily distribute vegetation throughout an entire scene or even create a network of roads, and much more. With MoGraph, artists and architects can keep their visualizations flexible right down to the wire and lets them get the results they’re looking for. MoGraph creates solutions and is a game changer for your workflow.

With just a few elements you can build more complex parametric objects:

 Modeling with Deformers
Bend, compress or twist an object witout manhandling its geometry. This – and much more – is what Deformers can do. Deformers work non-destructively and are ideal for creating complex objects that can be modfied at any time. The perfect workflow solution when production requirements throw you a curve.
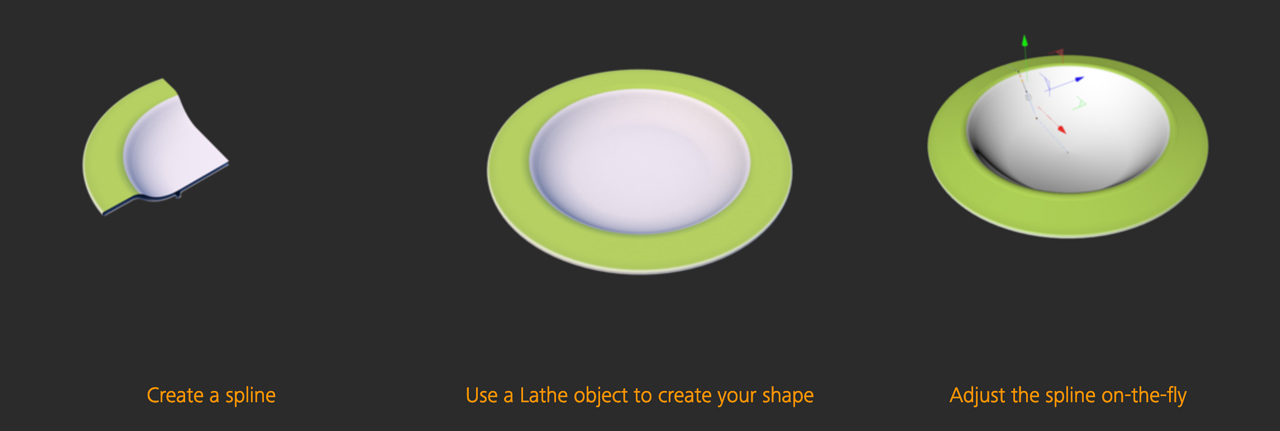
Modeling with Splines
A spline is much more than just a line: Create complex 3D objects using splines and Generators in Cinema 4D. Simply take a path from a technical drawing and place it into a Generator to create a 3D object and modify it at any time by changing its settings in the Attribute Manager.
Sculpting
Turn your models into digital clay
Model organic surfaces and easily increase the level of detail on any object with the fully-integrated Sculpt system in Cinema 4D. Simply click Subdivide to increase the level of detail, transforming your mesh into digital clay. Mold your mesh with intuitive sculpting tools that pull, smooth, flatten, knife and pinch the surface. Take advantage of advanced symmetry options, stamps, stencils and masks to create complex sculpts and surface details.

Organize in Layers
Organize your sculpt project in layers, each with its own Sculpt level, mask and strength settings. Simply click any layer to activate it and jump to the appropriate level of detail. Arrange layers in any order and even within folders, so it’s always easy to find and activate the right layer. You can freeze your sculpts at any time to release the memory being used by sculpting and view the effect of deformation on your sculpted mesh.
Flexible Tools
Mold your mesh with Cinema 4D’s flexible sculpting tools, each of which have unique size and pressure options that can be interactively adjusted or linked to the properties of your tablet pen. Smoothly paint continuous strokes with the Steady Stroke option. Use special drag options to precisely place Sculpt Stamps, and easily create repetitive stamps with the Repeat tool. Sculpt finer details with the help of masks and stencils. Create and share your own stamps and stencils, or take advantage of the extensive preset library provided in Cinema 4D. Finally, you can create your own sculpt brushes or take advantage of Cinema 4D’s extensive developer community to extend the power of the toolset even further, with extensive Python and expanded C++ support for the entire Sculpt system.
- Pull Brush – The Pull brush lifts the vertex points (or lowers them) in the average direction of the Normals (in the region of the brush’s preview). This brush is also well-suited for use with the Stamp and Stencil functions.
- Grab Brush – As the name suggests, this brush can be used to grab part of the mesh and pull it into the desired position. Great for shaping a character’s chin or head, or creating spiky bits.
- Smooth Brush – The Smooth brush is one of the most important sculpting brushes. The Smooth brush – with a low Strength value – is ideal for relaxing the mesh and removing artefacting.
- Erase Brush – Use the Erase brush to delete sculpted regions of an active Layer, i.e., wherever the Erase brush is applied, the sculpted regions will be reset to a neutral state.
Mirror and Masking
The powerful Symmetry options within each sculpt brush now support Cinema 4D’s workplane, so you can easily mirror strokes across an offset axis. Keep your strokes fast and fluid by focusing on one side of the model, and use the new Sculpt Symmetry option to mirror strokes across the mesh or even equalize the sculpting on both sides. To further focus on small sections of the sculpt, simply hide polygons using a mask.
Base Meshes
Use your own models or one of the base meshes provided in the Sculpt presets library. The library’s generic human, animal and dinosaur forms provide a great start for many sculpting projects. Simply double-click any mesh, click Subdivide a few times and start sculpting.
Mesh Projection
Combine multiple Sculpt objects into a single sculpt with optimized edge flow using the Project Mesh feature. Whether you need more edges to sculpt appendages or just want to optimize the mesh for animation you can model a clean topology over your existing sculpt and quickly adapt it to the final shape with all the sculpt details intact, based on the defined subdivision settings.
Unsubdivide
The Unsubdivide command allows you to quickly convert high-resolution meshes from other sculpting applications to low-resolution Cinema 4D objects with Sculpt tags containing all the same detail. This makes it easy to modify and work with meshes from any source.
Baking
With Cinema 4D’s integrated sculpting you can freeze and deform your sculpted creations without the need to bake them. Optimize the scene and prepare it for export to game engines or other applications by baking the sculpt to lower-polygon geometry with automatic creation of Ambient Occlusion, displacement and normal maps.
Volume Modeling
Modeling and More with the Power of OpenVDB
Create complex models by adding or subtracting basic shapes in Boolean-type operations, or create animated growing effects by turning noises and the new MoGraph Fields into actual geometry – it’s all possible thanks to Cinema 4D’s OpenVDB-based Volume Builder and Mesher. Volume Modeling offers a completely procedural way of creating objects you couldn’t even imagine before.
A New Way to Model
Build organic or hard-surface volumes in a very procedural way – combine multiple primitives and polygon objects with Boolean operations like Union, Subtract and Intersect. Add or subtract splines, cloners, fields and more to quickly create complex shapes, and smooth or reshape the result with voxel modifiers. With VDB remeshing, you can quickly re-topologize meshes to more effectively add details using Cinema 4D’s powerful sculpting toolset.

Volumes and Fields – Better Together
- Fields as Volumes – Use Random or Shader Fields to create volumes based on procedural textures or 3D noise.
- Fields as Modifiers – Use fields to adjust the strength of smooth and reshape filters, inflating or eroding objects based on field shapes and patterns.
- Volumes as Fields – Volumes can themselves be Fields, with their strength or direction affecting the nearest clones.

Data in 4 Dimensions
OpenVDB is fundamentally a way to store 3D pixels. Cinema 4D can load multiple grids from any .vdb file, and load animation via sequenced .vdb files. Release 20 does not yet offer native volume rendering but VDBs created in Cinema 4D can be exported in sequenced .vdb format for use in any application or render engine that supports OpenVDB.
TEXTURING
Materials/Shaders
Fast and Flexible Surfacing
Cinema 4D offers a fast and flexible material system, with procedural shaders to quickly define the surface of your 3D models. Generate exquisite photorealistic materials with multi-layered reflections or unique abstract effects using Cinema 4D’s multiple material channels and many special purpose procedural shaders.
- easy to understand
- neatly organized
- powerful
- flexible
Cinema 4D materials are easy to understand, with neatly-organized material channels that are named for what they do – to adjust the luminance, transparency or displacement of a material simply click the channel, load an image or shader, and adjust some sliders. Procedural shaders add power and flexibility so it’s easy to create photoreal and fanciful textures.
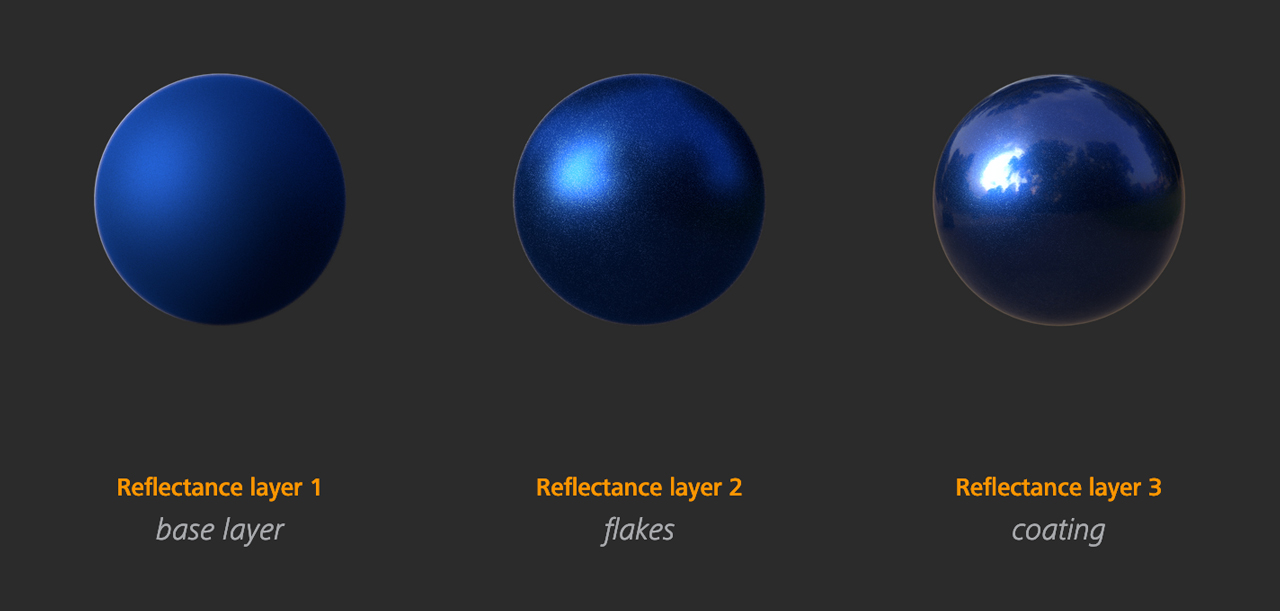
Reflectance channel
Create physically accurate materials with multiple layers of reflection using the Cinema 4D Reflectance Channel. Stack metallic flakes, anisotropic scratches and clear coat on top of a diffuse base layer, dial in the roughness and strength of each layer and enjoy materials that fully react to the lighting environment.
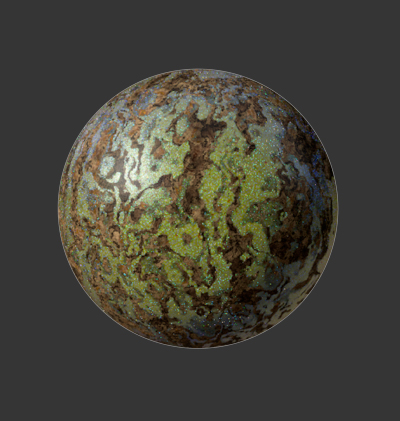
Flexible Shaders
A wide range of shaders in Cinema 4D provide special-purpose material options, such as replicating a rainbow thin-film effect on a bubble or oily surface, or simulating wood or bricks with a multitude of options and presets. MoGraph and Variation shaders make it possible to uniquely color and texture a vast number of objects. These are just a few examples of Cinema 4D’s powerful and purposeful shaders.
Infinite possibilities
Powerful layering options at the shader level, within reflectance and for materials themselves offer unlimited options for combining basic elements to create incredibly complex and detailed materials.

Node-Based Materials
Building Blocks for your Material World
Node-based materials in Cinema 4D Release 20 invite you to explore a whole new world of material-creating possibilities. Create simple materials that link a texture in multiple channels for easy adjustment, or create amazing and complex shaders that can be used in Cinema 4D’s Advanced and Physical Render engines.
Everything Starts Small
Each node performs specific functions – from color correction to camera distance, generating noises, gradients, patterns, flakes or scratches … and these only scratch the surface – Cinema 4D Release 20 includes over 150 nodes you can use to build your textures. Don’t worry – they’re all fully searchable by name and keyword, and can be easily added via a commander interface.
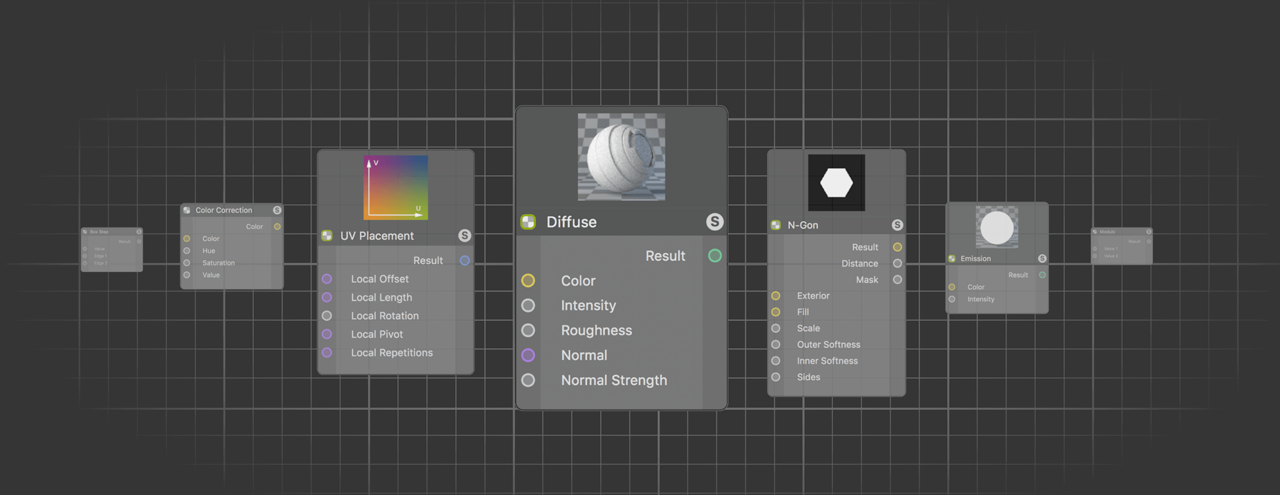
Each node offers a specific function but when you combine them, the possibilities are endless. You can easily drag wires to connect inputs and outputs and add converters to existing connections. Enable previews at any stage and selectively mute connections to understand how each node contributes to the material. Combine nodes into groups, groups into assets, and use those assets yourself or share them as .zip files.
The Power of Nodes
- ONE NODE, MULTIPLE CONNECTIONS – Reference a single color, texture or other element in multiple channels throughout a material. When the time comes to make a change, you only have to do it once.
- A MATERIAL OVERVIEW – The Node Window provides a complete overview of every element so you don’t have to dig through multiple channels and shaders to view everything contributing to a material.
- CUSTOM INTERFACES – Combine nodes to create custom shaders and expose only the parameters you want to modify or let others to tweak.
- REUSABLE ASSETS AND VERSIONING – Create assets from Node groups and store them in the scene, in the preferences, or share them with others as a simple .zip file. Assets include complete versioning so you can easily manage updates.
One Material to Rule Them All
The ultimate asset – a completely new generic material, called Uber Material. This simplified and easy-to-use material can be added and edited in the Material Editor or Attribute Manager, and any connection you make can also be seen in the Node Editor. The truly courageous can even open the asset within the Node Editor and see how a complete material is made up.
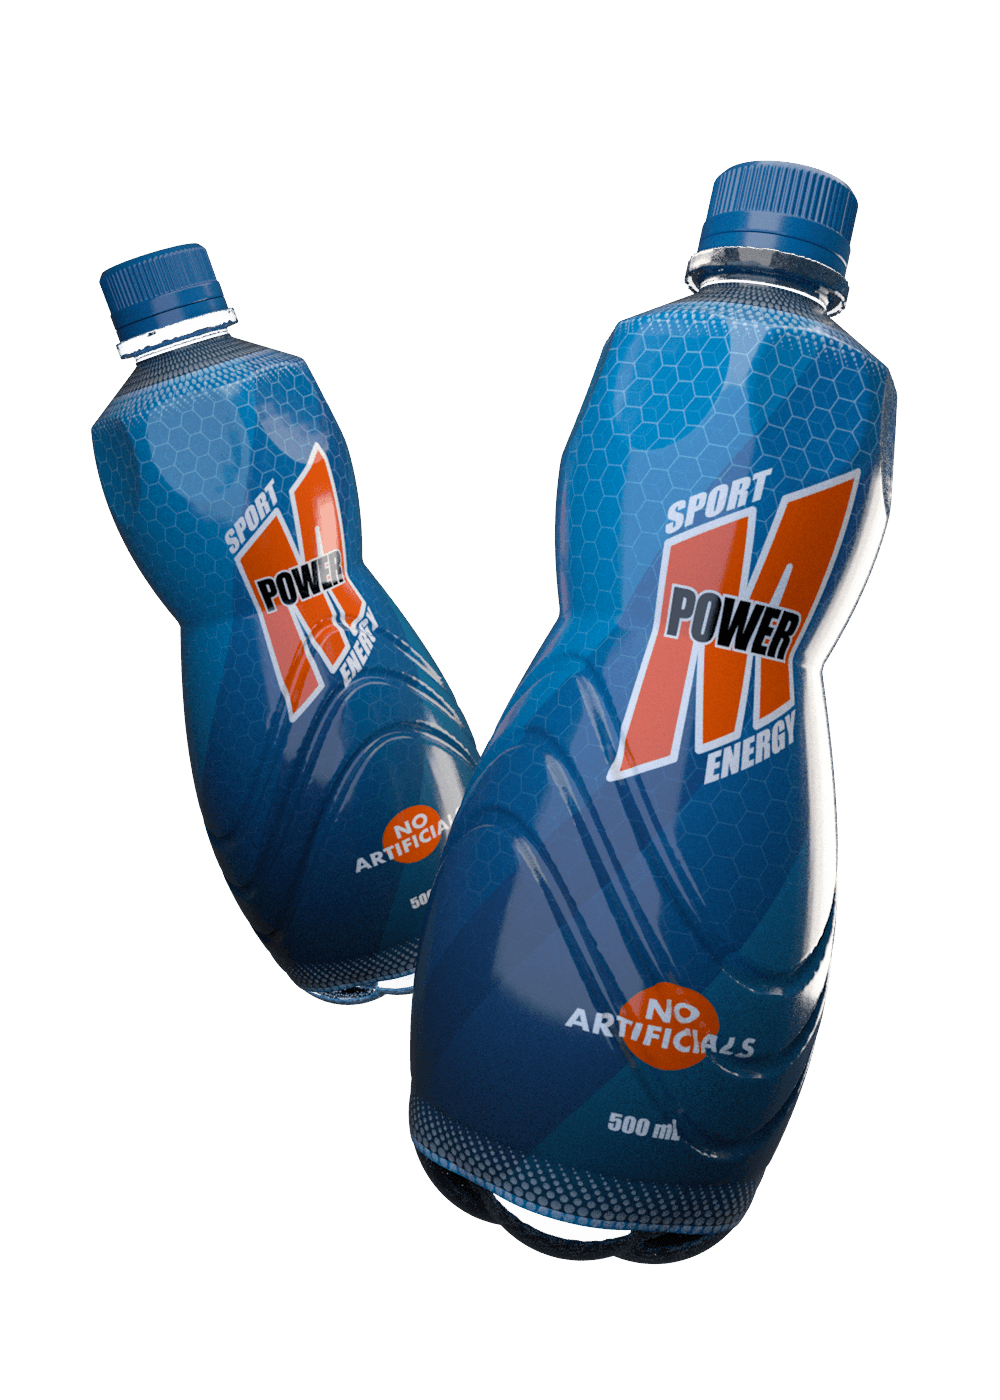
3D Painting
BodyPaint 3D
Impressive Texturing & Sculpting
Maxon’s BodyPaint 3D is the ultimate tool for creating high-end textures and unique sculptures. Wave good-bye to UV seams, inaccurate texturing and constant back-and-forth switching to your 2D image editor. Say hello to hassle-free texturing that lets you quickly paint highly detailed textures directly on your 3D objects. BodyPaint 3D also offers a comprehensive set of sculpting tools that let you turn a simple object into a detailed work of art.
Why 2D Painting is never enough for 3D textures
- IMMEDIATE FEEDBACK
When you use BodyPaint 3D to paint complete materials onto your 3D models, you’ll immediately see how the texture fits with the contour of the model, how the bump or displacement react to lighting, and how the transparency and reflection interact with the environment. There’s no need to waste time transitioning textures between environments – you’ll always see an accurate depiction of the texture so you can concentrate on making it look great. - TOOLS, TOOLS, TOOLS
More than 200 presets put a wide array of natural media and special effects brushes within easy reach. Clone, Smear, Sponge, Dodge and Burn, Gradient, Magic Wand, transform tools and more are all available within the easy to use interface. - DISTORTION-FREE PAINTING
No matter how hard you try – UVs will never be 100% perfect. Some parts will be slighty scaled, distored or twisted because you are trying to project a 3D object onto a 2D plane. You have to keep this in mind while painting your textures in 2D. Sometimes this produces unpredictable results. BodyPaint 3D’s projection painting takes all this into account and projects your texture the way you intended it to look on the 3D object on which you were painting. - 32-BIT COLOR & HDR EDITING
You can paint in up to 32-bit color depth, which gives even more texture control and incredibly smooth color gradations. BodyPaint 3D also enables editing of HDR and EXR formats letting you to use these powerful formats in your 3D scenes. - DIRECT CONNECTION TO YOUR 3D APPLICATION
Normally, creating textures using 2D applications and including these in your 3D scene involves a lot of manual setup and a lot of application switching. BodyPaint 3D offers plugins to easily exchange models, textures and UVs between BodyPaint 3D and popular 3D applications like 3ds Max, Maya and Softimage. - PAINTING MULTIPLE TEXTURES AT ONCE
With BodyPaint 3D you can paint an entire material with a single stroke. Each brush can paint up to ten channels simultaneously, so a single brushstroke can affect Color, Bump, Specularity, Reflection, Transparency and other properties. There is no need to match the various channels in your 3D application. - PAINTING OVER MULTIPLE OBJECTS
BodyPaint 3D can paint over multiple objects using a single stroke. Projection painting allows distortion-free painting across multiple objects to eliminate seams and get the results you want – which is not possible in 2D!
UV Tools
Maxon BodyPaint 3D features an arsenal of UV editing solutions that ensure your models and their materials line up properly.
Painting in 3D is governed by UVs, a set of coordinates that relate polygons to texturing areas. Properly designed UV coordinates are essential to successful painting and quality texturing in 3D. Because almost all 3D models involve contours in 3D space, standard projections like spherical and flat mapping are not able to provide distortion-free texturing. Each model must be set up with correctly aligned UVs prior to painting, just like taping off the trim in a room prior to painting.
Optimal Mapping & LSCM Unwrapping
BodyPaint 3D includes numerous tools that help you achieve the best UV map for each individual model. You can utilize one of three different algorithms, including Cubic Optimal Mapping, to automatically optimize your UV coordinates and remove overlapping points.
The Relax UV tool adjusts the size of UVs in relation to their corresponding polygons, and the UV Terrace tool lets you easily include additional geometry in an existing UV map. The Store and Remap UV features allow you to easily remap areas of UV coordinates to eliminate seams. Using BodyPaint 3D’s powerful Interactive Mapping feature you can generate UVs based on standard projection types for different regions of a model. Of course, BodyPaint 3D also includes Move, Scale, Rotate, Shear and other tools to let you manually tweak individual UV coordinates.
The LSCM unwrapping method, which lets you unwrap a model’s UVs based on defined seams, also comes in handy when working with complex shapes. Whether adjusting UVs for a low-res game model or a high-res matte painting, BodyPaint 3D provides the UV tools you can rely on when the UV mapping is not as perfect
as the model you have built.
Painting & Texturing
- PAINTING TOOLS
All your favorite painting tools are available in BodyPaint 3D, including Clone, Smear, Sponge, Dodge and Burn tools. The standard brush tool includes pressure, hardness, size, bitmap, distortion, rotation, jitter and other parameters for hundreds of painting possibilities. The effect of any parameter can be controlled by the pressure, tilt, direction or finger wheel of your graphics tablet. Over 200 presets are provided with BodyPaint 3D, representing a variety of natural media and special effects.
A real highlight of BodyPaint 3D is that it now supports the .abr format for Adobe Photoshop-compatible brushes. BodyPaint 3D artists can now take advantage of vast resources available in the Photoshop community. Thousands of brushes are available, many of them for free and we’ve even added over 1,400 brushes to the brush preset libraries. - LAYERING IN THE 3RD DIMENSION
This familiar layering system operates much like 2D graphics applications, giving you the power to combine various effects and experiment with confidence. In addition to its own B3D format, Maxon BodyPaint 3D can read and write layers and masks in PSD and TIF file formats. Each layer can be assigned a unique opacity and mix mode. BodyPaint 3D also features a real-time preview of layer transformations so you can easily position, scale, rotate, skew and distort layers until your composition is just right.
You can also define a mask in any layer, work with alpha channels or apply different blend modes to layers. Even .psd files can be read and their individual layers or layersets easily accessed. The Layer Shader makes it possible to quickly assign filters or procedural shaders to images. BodyPaint 3D is second-to-none when compared to conventional 2D image editing applications, and is ideal for high-end compositing and montage work. - PROJECTION PAINTING
Projection painting offers unmatched comfort when painting textures onto complex geometry. Visible seams at UV edges are now a thing of the past. The detachable projection layers in particular make this process easier by letting objects or images be placed freely before the projection is applied.
With projection painting enabled you can paint onto a virtual glass plate over the model and subsequently project this painting onto the actual textures. This powerful feature supports all of BodyPaint 3D’s painting tools and provides full control over the projection and final appearance of your paint strokes. Projection painting even allows users to paint across multiple objects with a single stroke to eliminate seams. Copy and paste paint between layers. You can copy and paste between layers while in projection paint mode and you can even join two separate images with perfect blending and distortion.
ANIMATION
Building professional 3D animation has never been easier or more intuitive.
Shift your scenes into the fourth dimension with Maxon’s Cinema 4D. Building professional 3D animation has never been easier and more intuitive. Virtually any object, material or tag parameter can be keyframed by simply clicking the circle next to its name. To make keyframing even simpler you can activate automatic keyframing of all or selected parameters. The Powerslider lets you quickly define keyframes for the current state at any frame and modify existing keyframes without leaving the default layout.
Timeline
The Timeline window offers even greater control with tracks for every animatable parameter and options such as layers to organize and control the visibility of objects, tracks and keyframes. Master Tracks allow easy manipulation of all keyframes attached to a given object or scene and the Region tool helps you easily move or scale any portion of your animation.
 Dope Sheet
View your entire animation in context, complete with markers. Manage keyframes for all your objects, or retime selected animation tracks.
 F-curves
Use F-Curve mode for more detailed adjustment of keyframe interpolation, or to simply view the animation. Edit multiple curves instantly and take advantage of the snapshot capability to view a previously stored curve while adjusting the animation.
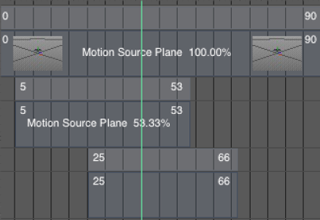 Motion Clips
Create a library of animations, and add them to your characters or other 3D objects. Blend multiple clips and re-time or loop the animation in non-linear fashion.
Flexible User Interfaces
- Animation Dot – An Animation Dot lies next to virtually every C4D parameter, and a simple click on it creates a keyframe. Animate with ease by simply adjusting the time, adjusting the value, and clicking.
- Powerslider – Create new keyframes, adjust timing and interpolation and visualize markers and sound waveforms, all within a compact bar directly below your 3D view.
- HUD – Add attributes as HUD elements and modify or animate your objects directly in the 3D view.
Procedural Animation
Use Cinema 4D’s effectors, tags and expressions to animate without keyframes. A variety of presets make it easy to get started, and you can create your own expressions in Cinema 4D’s node-based XPresso editor or via Python programming.
Character Animation
Adding Personality to Polygons
Cinema 4D offers a wide range of easy-to-use and reliable character animation tools and features that help you to create life-like characters and make character animation that much easier. Advanced features such as the Quaternion tag, Cappuccino for recording mouse movement as position data, and Auto Redraw for creating dynamic IK setups streamline the workflow for character animators and riggers.
Advanced Character Animation
Character animators and riggers alike need easy-to-use and reliable tools to help them create life-like characters. In addition to the functions contained in Cinema 4D Prime, Cinema 4D Studio offers numerous additional features that make professional character animation even easier!
- Character Component
The Character Component can be used by technical directors, for example, to define objects or hierarchies of a rig as components. Those components can then be packed into a template and be used by artists to easily create their objects using the Character object. All the power of Cinema 4D’s tools, including Python scripts, can be used to define these components. If you don’t do character animation you can use the Character Component feature to build templates for road systems, pipeline creators and more. Use your creativity to decide what to build with this powerful tool. - Character Object
The Character object lets you easily build a rig for any character based on expertly-crafted preset templates for bipeds, quadrupeds, fish and more. Automatic mirroring lets you build and adjust rigs symmetrically. Once you’ve adjusted the rig to your character, simply drag the mesh onto the Character object to automatically weight and bind the mesh to the rig. After completing this simple process you’ll have easy access to all Character object controllers and your character is ready to come to life. - Walk Cycles With CMotion
Use the CMotion object to create parametric, cyclical movement for any parameter on your character rig. Custom walk cycles or presets can be quickly and easily applied to your character and fine-tuned to fit your needs with the help of Function Curves. A spline can be added as a movement path and a surface as a floor and your character will interact with these elements and adapt its movement accordingly. An optimized muscle system with special deformers helps you create natural movement for organic shapes. The CMotion Step object also helps you fine-tune your walk cycles to perfection.
Interaction Tag
Exercise ultimate control over your 3D objects
In basic use, this tag works in conjunction with the Tweak mode to determine if objects can be moved without first being selected, and gives you control over object highlighting.
Use dynamic proxies to interactively adjust other objects based on the polygon selection you click to tweak. Particularly helpful for tasks like character rigging, the Interaction tag also reports all mouse interaction, including the polygon clicked, and allows controlling objects through XPresso, C.O.F.F.E.E. or Python.
Pose Morph
Mix Your Models with Sliders
The Pose Morph tag makes it quick and easy to define different character animation states and lets you morph between various types of animation data. Create facial expressions and correctional morphs, and control them with sliders or pose-space deformations. In addition to blending vertex positions, you can easily transition between rotations of entire joint hierarchies, parameters, user data, UVW or vertex maps.
MoGraph
On the move!
With the Cinema 4D MoGraph toolset, motion graphics artists can sink their teeth into a palette of powerful tools that make it easy to create everything from flying logos to abstract effects. Clone numerous objects and create extruded text with just a few simple clicks. Add Effectors to the mix and put everything in motion, and much more – often without creating a single keyframe! All this is perfectly integrated into Cinema 4D and offers a fast and easy workflow. All functions are completely interactive and non-destructive.
Cloner
At the heart of MoGraph is a powerful yet simple Cloner tool. You can easily create live copies of any object – arranged along a line, circle, grid, object or spline.
Object clones can be placed along points, edges, polygon centers or randomly across the surface of an object. Adjust keyframe parameters to modify clone count, spacing and more. Use other objects in MoGraph to easily create extruded text, fracture and extrude spline-based logos, displace objects in real-time and more. Each object performs its own invaluable function for motion graphics artists, and each can be fully controlled by MoGraph Effectors. Effectors can be applied to almost any MoGraph Generator to effortlessly bring your MoGraph creations to life. Adjust clones mathematically with the Formula Effector or apply the frequency spectrum of an audio file using the Sound Effector. 17 different Effectors can be used in any combination to offer countless animation possibilities.
- Shader Effector – The Shader Effector primarily uses a texture’s grayscale values to transform clones. To do this the texture needs to be projected on to the clones.
- Sound Effector – The Sound Effector transforms audio into animation by mapping the amplitude at specific frequencies to clones.
- Spline Effector – The Spline Effector takes the clones and arranges them on a spline. The first clone at the start of the spline and the last clone at the end of the spline.
- Delay Effector – The Delay Effector ensures that the effects of other Effectors with regard to position, scale and rotation do not begin abruptly but with a delay.
Voronoi Fracturing
Non-destructive destruction
With the new Fracture Voronoi object you can tear down walls. Systematically shatter any object into procedural fragments using virtually anything to control the distribution of the shattered pieces. Create artistic procedural geometry using splines, polygon objects or particles. Fracture Voronoi is always live which means you can change elements at any time. As a native MoGraph object it works seamlessly with Dynamics and all the effectors and falloffs you love.
Dynamics
Dynamics System for Stunning, Realistic Motion
MoDynamics is based on the proven Bullet physics library and now you can also use MoGraph’s powerful Effectors to add dynamics for amazing realism. Set simple parameters like mass, bounce, gravity, friction and more and let MoDynamics do the work. Create breathtaking, realistic motion every time.
Simulation
Let’s Get Physical
Whenever a large number of objects or particles interact with each other or are affected by forces such as wind or gravity, traditional animation methods quickly reach their limits. Animating these elements individually would be a gargantuan task. This is where simulation is the weapon of choice. Complex algorithms are used to generate the animation and interaction of these elements – and Cinema 4D offers a wide range of functions and presets to create breathtaking physical simulations and realistic-looking effects.

The typical behavior and properties of materials such as paper, cloth, hair, feathers or fur can be applied to different objects. In addition to their natural behavior, the properties of these materials can be modified to create abstract, unexpected behavior to fulfill any artist’s creative needs.
Cinema 4D also includes additional tools for creating dynamic simulations of mass, velocity and surface characteristics. Forces such as wind or gravity can be applied to these objects to easily create complex, interactive animations like filling a glass with water, collapsing a wall, making pool balls interact and much more. The Cinema 4D particle system lets complex simulations be created using vast numbers of objects.
Dynamics
Dynamics system for stunning, realistic motion
- Rigid Body Dynamics
Rigid Bodies are objects that fall, collide, bounce and more – in short, they interact with forces and with each other. Rigid Bodies interact with simulated natural forces and with each other. Parameters such as Mass, Velocity and Gravity can be used to easily lend dynamic behavior to thousands of objects containing millions of polygons! - Soft Body Dynamics
In addition to Cinema 4D’s Rigid Bodies you can use Soft Body Dynamics to simulate all kinds of objects that are deformed by collisions or other physical forces. Several settings such as stiffness, damping, flexion, etc. let you precisely define how your objects behave when struck, dropped or squashed. Even gas-filled elements can be simulated accurately. - Aerodynamic Forces
Animate with air? The new aerodynamic features in Cinema 4D make it possible! Simulate air currents and let feathers, paper or leaves glide gently through the air. Use the Double-Sided option to let forces affect objects that have no real depth.
Additional Tools
Cinema 4D Studio’s Dynamics contains much more than just Rigid and Soft Bodies. You can use connectors such as hinges, cardans and springs to let objects interact. Angular or linear motors can move your objects without setting keyframes. And to top it off, torque and speed can be set individually to fine-tune your animation.
- Force – The Dynamics Force object causes each object to exercise its own radial gravitational force onto every object within its reach.
- Motor – A Motor is a Dynamics element that exerts a continuous force or torque on an object to which a Dynamics Body tag has been assigned.
- Connector – Connectors restrict the movement/ rotation of Rigid Bodies and Soft Bodies. Without Connectors, objects would only be affected by forces and collisions.
- Spring – Springs are elements that exert force that increases in accordance with their distortion.
Cloth Simulation
Dress Your Characters in Style
Cinema 4D’s powerful cloth simulation solution offers the full range of characteristics that are typical for fabrics, including stiffness, flexion, friction and many more. Cloth can even be made to stretch or tear, just like any real fabric would do, whether it’s wool or satin, cotton or silk. Cinema 4Ds cloth simulation is equipped with collision detection and interacts with itself or other scene elements.
Thinking Particles
Particles up to 11
Thinking Particles is an advanced rule-based particle system that uses Cinema 4D’s XPresso interface to provide complete control over individual particles and particle streams. Thinking Particles can interact with one another and with their environment. Points, edges, surfaces or complete Objects can be used as emitters or to trigger collision events that deflect particles or spawn new streams. Their potential and versatility make Thinking Particles an essential tool for artists to create highly advanced particle effects.
RENDERING
Overview
The Key to Ultimate Photorealism
Cinema 4D’s wide range of render options deliver fast and beautiful results thanks to their linear workflow, support for color profiles, multiple processors, HyperThreading and Multi-Core technology. The built-in Advanced Renderer is a professional tool for creating outstanding images and animations, ranging from standard 2D and 3D to stereoscopy.
Its Multi-Pass rendering allows you to easily render color, shadow, reflection, and other effects to individual files. Multiple object-based alpha channels make it easy to layer elements with other 2D and 3D assets. With direct export to standard applications such as Adobe Photoshop, Adobe After Effects, Final Cut Pro, Nuke, Shake, Fusion or Motion, your Multi-Pass layers will be ready to composite in no time. Cinema 4D supports rendering in 16-bit and 32-bit color depth for high dynamics range images in DPX, HDRI or OpenEXR format.
Physical Renderer
The Physical Render Engine in Cinema 4D lets you render with ultimate realism using real camera settings like focal length, shutter speed, aperture, etc. to add 3D depth of field, optical accurate motion blur, area shadows, ambient occlusion and more to your scene. You can optionally simulate additional characteristics of real-life cameras such as lens distortion, vignetting and chromatic aberration for even more photorealism.
The Physical Renderer’s shared image sampler samples the Project just once and shares the result between all these effects, reducing the incremental time and guaranteeing accurate results.
- Global Illumination
Achieve greater rendering realism with Global Illumination, which provides a more accurate representation of scene lighting by taking into account light that bounces between objects. The Global Illumination engine can also utilize an HDRI-based sky for outstanding image-based illumination. - Caustics
Caustic effects simulate the specific refractions and reflections of light on shiny surfaces or through transparent objects. Light that reflects from a golden ring or shines through the water to the bottom of a swimming pool – Cinema 4D makes it easy to create these effects, resulting in highly realistic and accurate scenes.
External Renderers
Cinema 4D is also supported by all major third party renderers.

Sketch and Toon
With the Sketch and Toon toolset in Cinema 4D you create non-photorealistic styles of 3D renderings.
Architects and engineers enjoy the clean and precise technical illustrations it provides, while artists will appreciate the ability to render 3D scenes as a quick scribble or charcoal sketch. Several settings make it easy to create illustrations ranging from halftone stills to cel-rendered animations and to create almost any desired effect.
AND MORE!
- Stereoscopic Rendering
A few simple settings convert any Cinema 4D camera into a stereo rig. Simply enable one of the stereo modes, define the eye-separation and convergence, and choose between parallel, off-axis, on-axis or radial placement. Safe regions can be set manually or defined automatically by Cinema 4D. You can render the merged image or individual channels and preview the stereo effect within Cinema 4D’s Picture Viewer. Stereo previews can be displayed in Anaglyph, Side-by-Side, Interlaced or Active Shutter mode for compatibility with a variety of 3D monitors, projectors and glasses. - Team Render
Team Render is Cinema 4D’s network rendering concept that uses peer-to-peer communication to distribute render tasks. Because there’s no bottleneck at a central server, the assets required to render your scene get to each client quicker, speeding up network rendering of animations as well as still frames dramatically.
For bigger studios Team Render Server combines the advantages of a traditional client-server architecture which allows users to control all the render jobs via a web interface with Team Render’s decentralized data exchange. Team Render Server lets you directly upload, monitor and control your network rendering jobs, and view the log status messages from the server and all clients.
Lighting
Let there be light
Cinema 4D offers a wide variety of light and shadow types that can brighten up even the most challenging situations. Cinema 4D’s extraordinarily powerful lighting system offers numerous options to control color, brightness, falloff and other properties, and for adjusting density and color of each light’s shadows. Light settings such as contrast, lens reflexes, visible or volumetric light, noise, and the possibility to use Lumen or Candela brightness values provide highly realistic results for your scenes.
IES Lights
Many light manufacturers offer IES data for free download to realistically simulate the look of real lighting fixtures. Brightness, color temperature, falloff and direction are already included in IES lights to produce the most realistic lighting. Cinema 4D already includes several pre-defined, ready-to-go setups.
Physical Sky
Cinema 4D’s amazing Physical Sky makes it easy to create natural outdoor surroundings for your scene. A large collection of presets including clouds, haze, atmosphere and global positioning helps you to set up the fitting environment.

CINEMA 4D RELEASE 21 COMPLETE FEATURE LIST
GENERAL
Customer Journey
- Only one version of Cinema 4D:
- No more Prime / Visualize / Broadcast / Studio / BodyPaint editions.
- All functionality is in the one version, no separate editions anymore.
- Demo and Educational versions are no longer separate downloads.
- Demo and Educational can be upgraded to a commercial version.
- New Licensing Solutions
- MyMaxon Account:
- Allows Sign In / Sign Out – entitlement can be moved between devices.
- When creating a MyMaxon account, a 14-day trial license is automatically created.
- Real-time licensing, buy and use immediately
- Remote license retrieval – release a license remotely via your MyMaxon web portal.
- New Maxon License Server:
- Runs as service on Windows and daemon on OSX/Linux.
- Web-browser interface.
- Different Maxon Accounts can pool their licenses on a single server.
- Greater control over license for client and server.
- Graphical view of license use, current and past.
- Detailed license view of ownership and validity.
- Extended log and info messaging.
- RLM Licensing:
- Greater flexibility in license selection.
- MyMaxon Account:
- Improved Installation:
- Online installer – faster, hassle-free installation.
- Offline installer – small download, more languages supported, faster installation.
Exchange
- Merge Scenes on Drag-and-Drop.
- Show Import/Export Dialog Preference (option to show / suppress dialog by default – alt-click inverts default behavior).
- File selector now appears after export settings (rather than before).
- Updated CAD format support:
- New, Improved support for Solidworks, STEP, Catia, IGES, JT formats.
- Option to import instances as Regular or Render Instances.
- Import hidden objects with “_hidden” name suffix.
MODELING
- Caps and Bevels:
- Improved constrained / internal bevels via Straight Skeleton Algorithm.
- User-defined Bevel Shape via Spline UI.
- Option to Link Start/End Caps.
- Delaunay Cap Skinning.
- Library of Bevel Presets.
- Additional and more obvious automatic selection sets for Shell, Edges.
- Caps and bevels are always created as a single object.
- Volume Builder and Volume Mesher:
- Vector Volumes.
- Improved UI for Volume Filters.
- Cache Layer.
- Spline UI to define scale along spline.
- Curvature Vertex Map on Volume Mesher.
- Modeling Core:
- Dramatic Speedup in migrated commands including Extrude, Extrude Inner, Split, Polygon Group to Object.
- Migrated Tools (Point Extrude, Weld) preserve surface attributes like UVs and Vertex Colors.
- Copy / Paste Components (points and polygons).
- Primitive Caps (Cone, Cylinder, Capsule, Oil Tank, Torus, Tube and Figure) are now welded.
- Landscape object pivot remains at the bottom of the generated object.
- Improved Grow Selection command.
- Improved performance of Isoparm Display.
- Region-based selections support backface culling.
- UV Editor Enhancements:
- Migrated Texture View to OpenGL:
- Supports Anti-Aliased display of UV lines.
- Improved redraw Speed.
- UV Component highlighting.
- UV Transform Gizmo.
- UV Ruler display.
- Quantized UV transformations.
- Snapping support for UV points and edges.
- Viewport selection automatically updates UV component selection.
- Migrated Texture View to OpenGL:
- Connect Objects + Delete now sets the axis to the bounding box center of selected objects (Alt sets to the last selected parent).
MATERIALS AND RENDERING
- Denoiser (Intel Open Image Denoiser)
- Albedo Pass
- Node Interface Improvements
- Node Spaces and 3rd-Party API
- Interactive Drag and Drop (Ctrl-Drag to Copy Nodes)
- Rearrange Node Ports
- I/O Nodes
- Edit Asset mode
- Asset protection
- Physical Render Nodes
- Custom AOVs (Multi-Pass)
- Line node
- Spline Mapper node
- Multi-Trace Ray node
- Cells Node
- 2D Nodes
- Average Area
- 2D Blur
- Cache
- Kernel
- Get Context Node outputs vertex positions of sampled polygon
- ProRender
- Node Material support
- Volume Rendering
- HDRI Out of Core
- Camera animation included in Linear Motion Blur
- New Diffuse, Direct Illumination and Wireframe Render Modes
- New Multipasses:
- Ambient Occlusion
- Direct Illumination
- Indirect Illumination
- Direct Reflection
- Indirect Reflection
- Indirect Diffuse
- Refraction
- Volume
- Albedo
- Interactive Tone Mapping via Picture Viewer Filter Tab
- Render Queue – Option to disable auto-renaming
WORKFLOW/UI
- Interface Enhancements:
- Support for HiDPI monitors on Windows.
- HiDPI Viewport on Windows, Retina Viewport on macOS.
- Improved Interface Speed (especially in Timeline).
- Modernized Light and Dark schemes.
- Improved menus and minor adjustments to Default layout.
- macOS Menu Bar support.
- macOS Dark Scheme support
- Reset Scheme Colors option.
- New Shortcuts:
- Save Incremental: Ctrl+Alt+S
- Texture View Fit to Screen: H
- UV Transform: Ctrl+T
- Normal Scale: M~-
- Melt: Alt+Backspace
- Dissolve: Ctrl+Backspace
- Improved Default values
- Improved OLE-based Drag and Drop file exchange
- Project Asset Inspector:
- Supports Images, Videos, Sound files, External files, IES Lights, GI Cache, MoGraph Cache, Substances, Volumes.
- Supports Objects, Tags, Viewports, Render Effects, Materials and Shaders.
- Consolidate command collects all assets associated with the project.
- Group by Asset Name, Type, Element Type, Layer, Take, Node Space, Format.
- Info Area displays information about selected asset.
- Quickstart dialog
- Enhanced Splash Screen
- Default Material preference (choose which material type is created when double-clicking in the Material Manager).
- Asset Linking preference (always copy textures, always use absolute path).
- Color Chooser enhancements:
- Swap Colors
- Swatches in Color Chip Context Menu
- Color Swatches palette can be resized
- Spline UI enhancements:
- Double – Scale and copy existing curve
- Symmetrize – Scale and mirror existing curve
- Commander now remembers last input
- Custom, colorizable object and tag icons
- User Data tag
- User Data Manager – save and load presets
- Attribute Manager now indicates when selected object count exceeds AM Edit limit.
- OS-specific Feature Highlighting
MOGRAPH AND ANIMATION
- Field Force object:
- Dynamics and Particle Advection (influence the velocity of particles and dynamic objects with Fields).
- Field Interface enhancements:
- Sub-fields appear as children in field list.
- Fields can be used as masks for another field.
- Channel Convert Field Layer – convert between value, color and direction.
- Normal Tags can now be used as fields, and have a field list (for use Target Effector, Field Force, etc).
- Character Animation:
- Improved Auto-Weighting Algorithms (Bone Glow).
- Weighting Workflow Improvements.
- Mixamo Control Rig.
- Connect Objects + Delete can merge Weight tags of individual objects into a single Weight tags
- Repeat, Offset Repeat and Oscillate in Track Before / After now default to 0 / unlimited repetitions.
- Align to Spline tag values can now extend beyond the 0-100% range, allowing easy repetition and parametric animation.
- Thinking Particles support for all particle forces (via PForceObject).
SDK
- Reorganized Extensions Menu for easier access to scripts and development tools
- New licensing tools
- Python: UserData Tag to store user data parameters
- C++: Python scripts can now be executed from within C++ code
- C++: New render_filter.framework to implement custom render filters
- C++: AutoWeightInterface allows developers to define custom auto-weight algorithms
- C++/Python: Functions to adjust AutoWeight settings and execute AutoWeighting
- C++: New Geometry Utility functions
- C++: New function to bake a 2D representation of a BaseShader – BaseShader.BakeShaderIntoBaseBitmap()
- C++: New Flag in Material Plugin registration to allow 3rd party materials to be set as the default material
- C++: New Color Utility functions
- C++: New Volume Utility functions
- C++: New Debug Utility function DiagnosticVarOutput()
- C++: New Utility function to create salt and hash for storing encrypted passwords
- C++: New Tension property in SplineData
- C++: GeUserArea enhanced to support line drawing via ellipse, bezier and polygon, additional line styles and opacity
- C++/Python: New flag to define the border style of Static Text in a GeDialog
- C++: Developers can now define BubbleHelp/Tooltips within TreeViews
- C++: CommandData virtual functions include a Parent manager GeDialog argument
- C++/Python: AOV multipasses can be created via RenderData.InsertMultipass()
- C++/Python: New method GetRecentDocumentList() returns the recently-opened documents
- C++/Python: New SceneFilter options for use with LoadDocument
- C++/Python: Functionality to define custom Object and Tag icons and icon colors (NodeData.Init() / MSG_GETCUSTOMICONS)

Reviews
There are no reviews yet.